本文由 发布,转载请注明出处,如有问题请联系我们! 发布时间: 2021-06-07TensorFlow 之 keras.layers.Conv2D( ) 主要参数讲解
加载中TensorFlow 之 keras.layers.Conv3D( ) 基本参数解读
keras.layers.Conv3D( ) 函数调用
    def __init__(self, filters,
                 kernel_size,
                 strides=(1, 1),
                 padding='valid',
                 data_format=None,
                 dilation_rate=(1, 1),
                 activation=None,
                 use_bias=True,
                 kernel_initializer='glorot_uniform',
                 bias_initializer='zeros',
                 kernel_regularizer=None,
                 bias_regularizer=None,
                 activity_regularizer=None,
                 kernel_constraint=None,
                 bias_constraint=None,
                 **kwargs):
主要参数:
filters 全连接层数量的转变,filters 危害的是最终键入結果的的第三个层面的转变,比如,键入的层面是 (600, 600, 3), filters 的数量是 64,变化后的层面是 (600, 600, 64)
>>> from keras.layers import (Input, Reshape)
>>> input = Input(shape=(600, 600, 3))
>>> x = Conv3D(64, (1, 1), strides=(1, 1), name='conv1')(input)
>>> x
<tf.Tensor 'conv1_1/BiasAdd:0' shape=(?, 600, 600, 64) dtype=float32>
kernel_size 主要参数 表明全连接层的尺寸,能够立即写一个数,危害的是輸出結果前2个数据信息的层面,比如,(600, 600, 3)=> (599, 599, 64)
>>> from keras.layers import (Input, Conv3D)
>>> input = Input(shape=(600, 600, 3))
>>> Conv3D(64, (2, 2), strides=(1, 1), name='conv1')(input)
<tf.Tensor 'conv1/BiasAdd:0' shape=(?, 599, 599, 64) dtype=float32>
立即写 2 也是能够的
>>> from keras.layers import (Input, Conv3D)
>>> input = Input(shape=(600, 600, 3))
>>> Conv3D(64, 2, strides=(1, 1), name='conv1')(input)
<tf.Tensor 'conv1_2/BiasAdd:0' shape=(?, 599, 599, 64) dtype=float32>
strides 步幅 一样会危害輸出的前2个层面,比如,(600, 600, 3)=> (300, 300, 64),特别注意的是,括弧里的数据信息能够不一致,各自操纵横坐标轴和纵轴,这儿步幅的计算方法为:
>>> from keras.layers import (Input, Conv3D)
>>> input = Input(shape=(600, 600, 3))
>>> Conv3D(64, 1, strides=(2, 2), name='conv1')(input)
<tf.Tensor 'conv1_4/BiasAdd:0' shape=(?, 300, 300, 64) dtype=float32>
padding 是不是对周边开展添充,“same” 即便 根据kernel_size 变小了层面,可是四周会添充 0,维持原来的层面;“valid”表明储存不以0的合理信息内容。好几个比照实际效果以下:
>>> Conv3D(64, 1, strides=(2, 2), padding="same", name='conv1')(input)
<tf.Tensor 'conv1_6/BiasAdd:0' shape=(?, 300, 300, 64) dtype=float32>
>>> Conv3D(64, 3, strides=(2, 2), padding="same", name='conv1')(input)
<tf.Tensor 'conv1_7/BiasAdd:0' shape=(?, 300, 300, 64) dtype=float32>
>>> Conv3D(64, 3, strides=(1, 1), padding="same", name='conv1')(input)
<tf.Tensor 'conv1_8/BiasAdd:0' shape=(?, 600, 600, 64) dtype=float32>
>>> Conv3D(64, 3, strides=(1, 1), padding="valid", name='conv1')(input)
<tf.Tensor 'conv1_9/BiasAdd:0' shape=(?, 598, 598, 64) dtype=float32>
根据这类非常简单的方法,能够观查 ResNet50 的构成构造
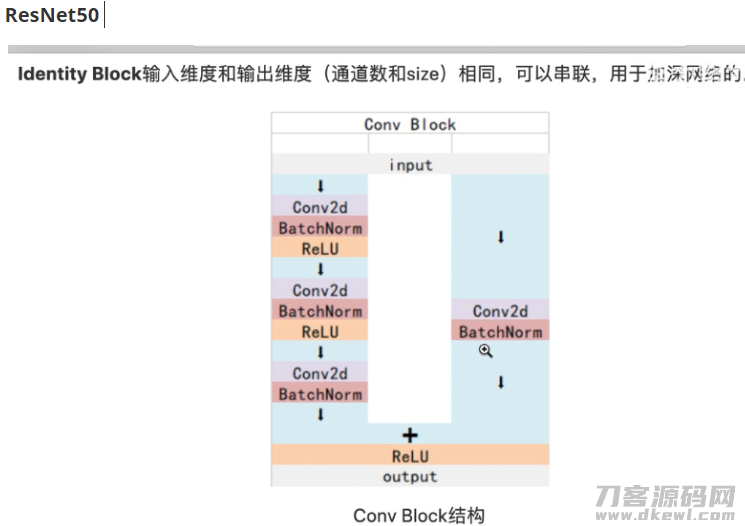
Conv Block 的构架:
def conv_block(input_tensor, kernel_size, filters, stage, block, strides):

    filters1, filters2, filters3 = filters  # filters1 64, filters3 256  将标值传到到filters。。。中
    conv_name_base = 'res'   str(stage)   block   '_branch'
    bn_name_base = 'bn'   str(stage)   block   '_branch'

    x = Conv3D(filters1, (1, 1), strides=strides, name=conv_name_base   '2a')(input_tensor)
    x = BatchNormalization(name=bn_name_base   '2a')(x)
    x = Activation('relu')(x)

    x = Conv3D(filters2, kernel_size, padding='same', name=conv_name_base   '6b')(x)
    x = BatchNormalization(name=bn_name_base   '6b')(x)
    x = Activation('relu')(x)

    x = Conv3D(filters3, (1, 1), name=conv_name_base   '2c')(x)
    x = BatchNormalization(name=bn_name_base   '2c')(x)

    shortcut = Conv3D(filters3, (1, 1), strides=strides, name=conv_name_base   '1')(input_tensor)
    shortcut = BatchNormalization(name=bn_name_base   '1')(shortcut)

    x = layers.add([x, shortcut])
    x = Activation("relu")(x)
    return x
Identity Block 的构架:

def identity_block(input_tensor, kernel_size, filters, stage, block):
    filters1, filters2, filters3 = filters

    conv_name_base = 'res'   str(stage)   block   '_branch'
    bn_name_base = 'bn'   str(stage)   block   '_branch'

    x = Conv3D(filters1, (1, 1), name=conv_name_base   '2a')(input_tensor)
    x = BatchNormalization(name=bn_name_base   '2a')(x)
    x = Activation('relu')(x)

    x = Conv3D(filters2, kernel_size, padding='same', name=conv_name_base   '6b')(input_tensor)
    x = BatchNormalization(name=bn_name_base   '6b')(x)
    x = Activation('relu')(x)

    x = Conv3D(filters3, (1, 1), name=conv_name_base   '2c')(input_tensor)
    x = BatchNormalization(name=bn_name_base   '2c')(x)

    x = layers.add([x, input_tensor])
    x = Activation('relu')(x)
    return x
最终是总体构架:
def ResNet50(inputs):
    #-----------------------------------#
    #   假定键入进去的照片是600,600,3
    #-----------------------------------#
    img_input = inputs

    # 600,600,3 -> 300,300,64
    x = ZeroPadding3D((3, 3))(img_input)
    x = Conv3D(64, (7, 7), strides=(2, 2), name='conv1')(x)
    x = BatchNormalization(name='bn_conv1')(x)
    x = Activation('relu')(x)

    # 300,300,64 -> 150,150,64
    x = MaxPooling3D((3, 3), strides=(2, 2), padding="same")(x)

    # 150,150,64 -> 150,150,256
    x = conv_block(x, 3, [64, 64, 256], stage=2, block='a', strides=(1, 1))
    x = identity_block(x, 3, [64, 64, 256], stage=2, block='b')
    x = identity_block(x, 3, [64, 64, 256], stage=2, block='c')

    # 150,150,256 -> 75,75,512
    x = conv_block(x, 3, [128, 128, 512], stage=3, block='a')
    x = identity_block(x, 3, [128, 128, 512], stage=3, block='b')
    x = identity_block(x, 3, [128, 128, 512], stage=3, block='c')
    x = identity_block(x, 3, [128, 128, 512], stage=3, block='d')

    # 75,75,512 -> 38,38,1024
    x = conv_block(x, 3, [256, 256, 1024], stage=4, block='a')
    x = identity_block(x, 3, [256, 256, 1024], stage=4, block='b')
    x = identity_block(x, 3, [256, 256, 1024], stage=4, block='c')
    x = identity_block(x, 3, [256, 256, 1024], stage=4, block='d')
    x = identity_block(x, 3, [256, 256, 1024], stage=4, block='e')
    x = identity_block(x, 3, [256, 256, 1024], stage=4, block='f')
   # 最后得到一个38,38,1024的共享资源特点层
    return x
另附基础理论连接 Resnet-50网络架构详细说明 https://www.cnblogs.com/qianchaomoon/p/12315906.html