本文由 发布,转载请注明出处,如有问题请联系我们! 发布时间: 2021-06-12通过Dapr实现一个简单的基于.net的微服务电商系统(十七)——服务保护之动态配置与热重载
加载中根据Dapr完成一个简易的根据.net的微服务架构电商系统(十七)——服务项目维护之动态性配备与热轻载
在上一篇文章里,大家根据引入sentinel component到apigateway完成了对中下游服务项目的维护,但是受制于现阶段变动component必须人力的再次引入配备及其重新启动应用更新component这些缘故,针对真正的自然环境运维管理稍有难度系数,近期我依据sentinel-golang有关文本文档再次撰写了一个动态性配备的作用并集成化到大家的电子商务demo管理方法端,今日就解读并演试一下它是怎样工作中的。
文件目录:
一、根据Dapr完成一个简易的根据.net的微服务架构电商系统
二、根据Dapr完成一个简易的根据.net的微服务架构电商系统(二)——通信架构解读
三、根据Dapr完成一个简易的根据.net的微服务架构电商系统(三)——一步一步教你如何撸Dapr
四、根据Dapr完成一个简易的根据.net的微服务架构电商系统(四)——一步一步教你如何撸Dapr之定阅公布
五、根据Dapr完成一个简易的根据.net的微服务架构电商系统(五)——一步一步教你如何撸Dapr之情况管理方法
六、根据Dapr完成一个简易的根据.net的微服务架构电商系统(六)——一步一步教你如何撸Dapr之Actor服务项目
七、根据Dapr完成一个简易的根据.net的微服务架构电商系统(七)——一步一步教你如何撸Dapr之服务项目过流保护
八、根据Dapr完成一个简易的根据.net的微服务架构电商系统(八)——一步一步教你如何撸Dapr之链路追踪
九、根据Dapr完成一个简易的根据.net的微服务架构电商系统(九)——一步一步教你如何撸Dapr之OAuth2受权 && 百度搜索版Oauth2
十、根据Dapr完成一个简易的根据.net的微服务架构电商系统(十)——一步一步教你如何撸Dapr之关联
十一、根据Dapr完成一个简易的根据.net的微服务架构电商系统(十一)——一步一步教你如何撸Dapr之全自动扩/缩容
十二、根据Dapr完成一个简易的根据.net的微服务架构电商系统(十二)——istio dapr搭建多运作时服务网格
十三、根据Dapr完成一个简易的根据.net的微服务架构电商系统(十三)——istio dapr搭建多运作时服务网格之工作环境布署
十四、根据Dapr完成一个简易的根据.net的微服务架构电商系统(十四)——开发工具器皿调节小窍门
十五、根据Dapr完成一个简易的根据.net的微服务架构电商系统(十五)——集中型api文档完成
十六、根据Dapr完成一个简易的根据.net的微服务架构电商系统(十六)——dapr sentinel分布式数据库完成服务项目维护
十七、根据Dapr完成一个简易的根据.net的微服务架构电商系统(十七)——服务项目维护之动态性配备与热轻载
附则:(如果你觉得对你有效,请给个star)
一、电子商务Demo详细地址
二、通信架构详细地址
最先大家看一下最后实际效果怎样,再次获取编码并rebuild以后,登陆admin.dapreshop.com:30882在基本配备增加了2个控制模块,在其中swagger文档仅仅简易的对系列产品15文章内容中建立的集中型文本文档的简单集成化。服务项目维护配备便是此次增加的一部分了,其页面以下:
在我们必须维护某一插口时,点一下增加过流保护标准,并根据往下拉挑选大家的服务项目 途径就可以配备一个标准,点一下储存并重新启动网关ip会全自动启用k8s开展component的轻载并重新启动apigateway。

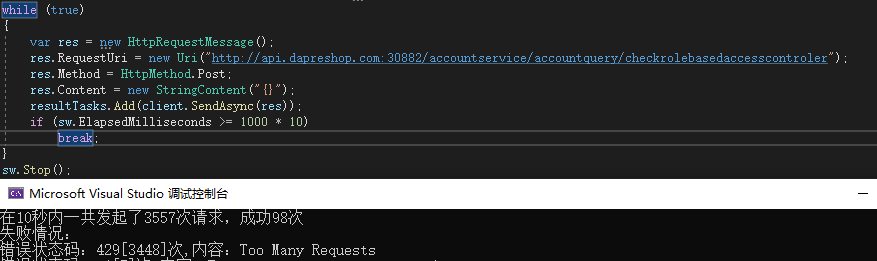
在略微等候20秒上下网关ip重新启动后(也可以根据应用kubectl get po -n dapreshop | findstr apigateway观查网关ip重新启动)就可以根据并发测试讨论一下其实际效果。能够见到恰当的对大家的插口造成了维护,也就是10秒内造成了100次上下的合理浏览,剩下的浏览被阻拦并回到了429要求太多。
在dapr的middleware-sentinel文本文档中能够见到还适用融断退级、高并发防护、网络热点主要参数这些标准,但是现阶段检测过发觉仅有服务项目过流保护标准回绝种类的过流保护对dapr合理,别的标准暂时没有实际效果,不清楚是否dapr1.2的bug或是什么原因,早已GitHub提了issuesl...
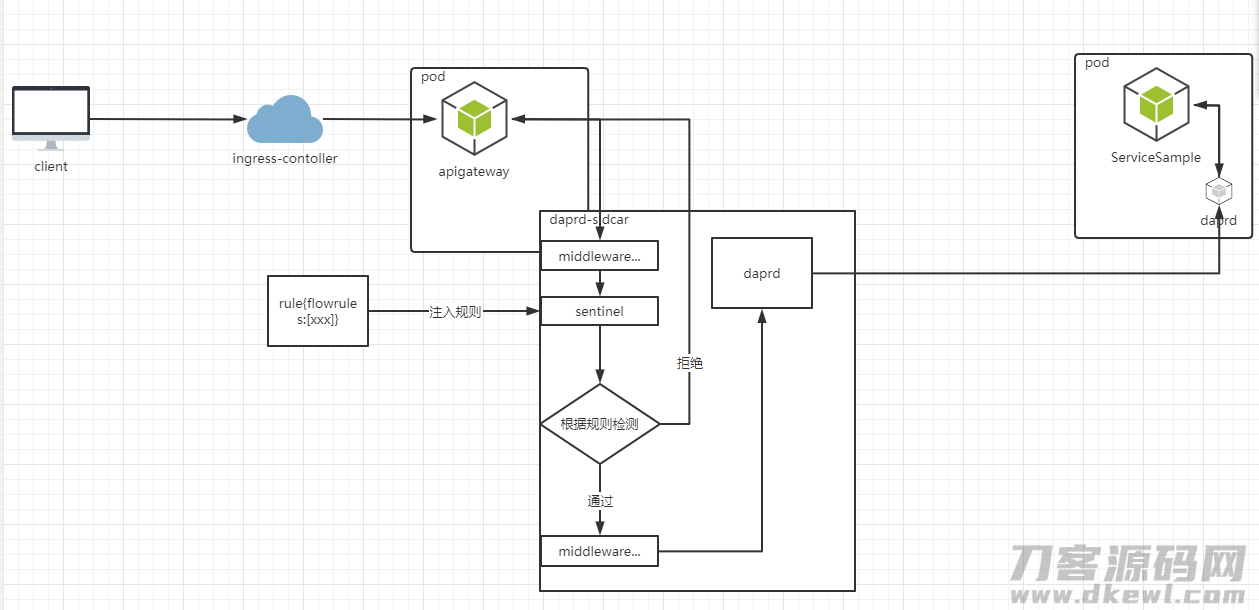
下边简易讲下怎样完成热更新的。最先大家必须在apigateway引入一个空的sentinel config component:
apiVersion: dapr.io/v1alpha1
kind: Component
metadata:
  name: sentinel
  namespace: dapreshop
spec:
  type: middleware.http.sentinel
  version: v1
  metadata:
  - name: appName
    value: "rules"
  - name: logDir
    value: "/tmp"
  - name: flowRules
    value: >-
      []
  - name: circuitbreakerRules
    value: >-
      []
然后我还在publicservice完成了热更新有关编码,实际编码在PublicService\Infrastructure\Common\AliSentinel中。根据引进了KubernetesClient的方法根据sdk实际操作component的读写能力及其deployment的升级。关键编码以下:
 static Kubernetes kubernetes = new Kubernetes(KubernetesClientConfiguration.BuildConfigFromConfigFile(SentinelComponentBaseConfig.kubeconfig));
        /// <summary>
        /// 申请注册标准
        /// </summary>
        /// <param name="aliSentinelConfig"></param>
        public static async Task RegisterSentinelConfig(SentinelConfigList aliSentinelConfigList)
        {
            await GetAndSaveSentinelComponent(component =>
            {
                component.FlowRules = aliSentinelConfigList.FlowRules.GetDistinct();
                component.BreakingRules = aliSentinelConfigList.BreakingRules.GetDistinct();
            });
        }
        /// <summary>
        /// 获得全部申请注册标准
        /// </summary>
        /// <returns></returns>
        public static async Task<SentinelConfigList> GetAll()
        {
            var component = await GetDefaultSentinelComponent();
            return new SentinelConfigList()
            {
                FlowRules = component.FlowRules,
                BreakingRules = component.BreakingRules
            };
        }
        #region 当地方式
        /// <summary>
        /// 获得默认设置的SentinelComponent
        /// </summary>
        /// <returns></returns>
        static async Task<SentinelComponent> GetDefaultSentinelComponent()
        {
            var component = new SentinelComponent();
            await component.Create(kubernetes);
            return component;
        }
        /// <summary>
        /// 传送授权委托变动默认设置SentinelComponent
        /// </summary>
        /// <param name="operatorComponent"></param>
        static async Task GetAndSaveSentinelComponent(Action<SentinelComponent> operatorComponent)
        {
            var component = await GetDefaultSentinelComponent();
            operatorComponent(component);
            component.SetMetaData();
            Patch(component);
            ReloadDeploy();
        }
        /// <summary>
        /// Patch SentinelComponent到k8s自然环境
        /// </summary>
        /// <param name="component"></param>
        static void Patch(SentinelComponent component)
        {
            var patch = new JsonPatchDocument<SentinelComponent>();
            patch.Replace(x => x.spec.metadata, component.spec.metadata);
            kubernetes.PatchNamespacedCustomObject(new V1Patch(patch, V1Patch.PatchType.JsonPatch), SentinelComponentBaseConfig.Group, SentinelComponentBaseConfig.Version, SentinelComponentBaseConfig.NamespaceParameter, SentinelComponentBaseConfig.Plural, SentinelComponentBaseConfig.ComponentName);
        }
        /// <summary>
        /// 重新启动有关deploy升级SentinelComponent
        /// </summary>
        static void ReloadDeploy()
        {
            var deploy = kubernetes.ReadNamespacedDeployment(SentinelComponentBaseConfig.DeploymentName, SentinelComponentBaseConfig.NamespaceParameter);
            deploy.Spec.Template.Metadata.Annotations[SentinelComponentBaseConfig.restart] = DateTime.UtcNow.ToString("s");
            var patch = new JsonPatchDocument<V1Deployment>();
            patch.Replace(e => e.Spec.Template.Metadata.Annotations, deploy.Spec.Template.Metadata.Annotations);
            kubernetes.PatchNamespacedDeployment(new V1Patch(patch, V1Patch.PatchType.JsonPatch), SentinelComponentBaseConfig.DeploymentName, SentinelComponentBaseConfig.NamespaceParameter);
        }
然后我们在application曝露2个插口用以get component和save component。在网页页面上连接有关插口后就可以恰当的载入和载入component并翻转升级有关k8s資源进而完成热更新。全部过流保护步骤大概以下:
好啦,今日的共享就到这儿,按照惯例热烈欢迎fork star~